5. OpenQuake IRMT settings
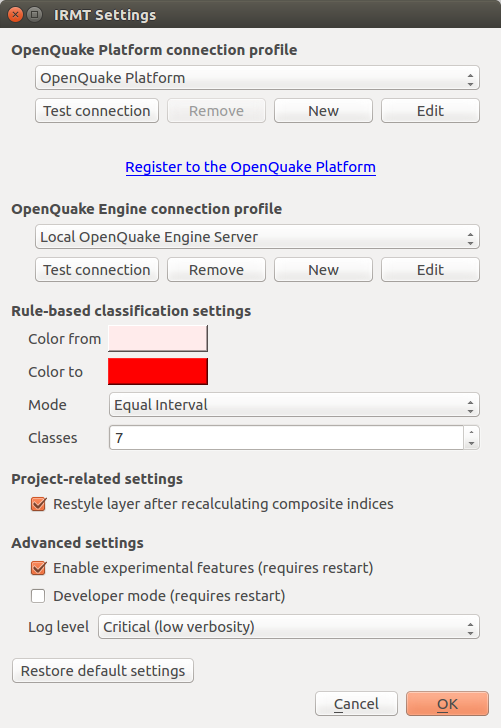
Fig. 5.1  OpenQuake IRMT settings
Some of the functionalities provided by the plugin, such as the ability to work with GEM data, require the interaction between the plugin itself and the OpenQuake Platform (OQ-Platform) or the OpenQuake Engine (OQ-Engine).
The OQ-Platform is a web-based portal to visualize, explore and share GEM’s datasets, tools and models. In the OpenQuake IRMT Settings dialog displayed in Fig. 5.1, credentials must be inserted to authenticate the user and to allow the user to log into the OQ-Platform. In the Host field insert the URL of GEM production installation of the OQ-Platform or a different installation if you have URL access. If you still haven’t registered to use the OQ-Platform, you can do so by clicking Register to the OQ-Platform. This will open a new web browser and a sign up page.
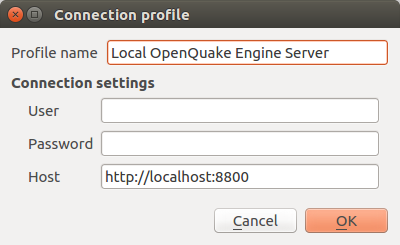
Fig. 5.2 Connection profile
The OQ-Engine is an open source application that allows users to compute seismic hazard and seismic risk of earthquakes on a global scale. It can run locally on the user’s machine, or on a remote workstation or cluster. The OQ Engine Server provides an HTTP RESTful API. The OpenQuake IRMT plugin leverages this API to enable the user to drive the OQ-Engine directly from within QGIS. In order to interface the plugin with a running OQ Engine Server (WebUI), it is necessary to insert in this dialog the user credentials (if they are required by the server) and the web URL where the service is hosted (see Fig. 5.2). By default, the host is set to http://localhost:8800, meaning that the plugin will attempt to connect to a OQ Engine Server (WebUI) running locally, on port 8800.
It is possible to create multiple connection profiles, and to edit or remove existing ones. For instance, you might want to use alternatively an OpenQuake Engine Server running on your local machine and a remote one running on a cluster. For this purpose, you can create the two connection profiles, and then select one or the other from the OpenQuake Engine connection profile dropdown menu. The buttons Test connection can be used to check if the plugin is able to connect to the corresponding server using the specified host name and credentials.
When the plugin loads an OQ-Engine hazard/risk map as a layer or when integrated risk indices are calculated, the corresponding map is automatically styled applying a rule-based classification with the parameters specified in the Rule-based classification settings. By default, whenever composite indices are calculated, the rule-based classification is applied and the layer is styled accordingly. On a project level, it is possible to avoid restyling the layer at each recalculation of the composite indices, by unchecking the corresponding option.
5.1. Advanced settings
The checkbox labeled Enable experimental features (requires restart) enables some functionalities of the plugin that are still experimental and not completely tested. It is not recommended for standard users.
It is possible to change the verbosity of the plugin log, by selecting a Log level in the corresponding dropdown menu. Levels are:
Info (high verbosity): whatever is notified to the user through the message box in the graphical user interface, will be also printed in the log.
Warning (medium verbosity): only critical messages (errors) and warnings will be printed in the log.
Critical (low verbosity): only critical messages (errors) will be printed in the log.
The checkbox labeled Developer mode (requires restart) can be used to log additional information for debugging purposes. It is useful for developers or advanced users for troubleshooting, but it is not recommended for standard users.
The button Restore default settings can be used to discard the settings customized by the user and to replace them with the factory defaults. Please be aware that such operation, once confirmed, can not be undone.